Wednesday, July 14, 2010

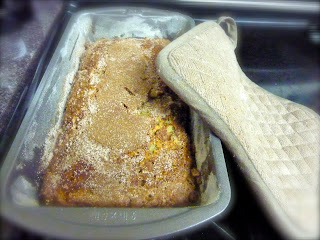
The Best Easy Banana Bread recipe with Cinnamon Swirls


I'm not gonna lie, I made this Cinnamon Swirl Banana Bread months ago and I have been withholding it from everybody.  Yea, I knew it was wrong, but I did it anyway.  This is seriously the best banana bread I have ever had.  It even beats out my mom's banana cake...but don't tell her I said that.  The best part about it? It's damn easy to make.  It honestly took me about 10 minutes to throw it all together, and then you just throw her in the oven and let her bake.  Done and done.


My analysis on the situation is that I think the coating of cinnamon and sugar on the top sort of hardens and forms a crust which in turn holds the moisture in and makes it cake-like and not so much bread-like.  Bread to me means dry and bland.  Cake is moist and sweet and delicious.  Throw some cinnamon and sugar in there yet and I think we found ourselves a winner.


Anyway, I got this recipe from Lovin' The Oven who I think got it from somewhere else.  Please, keep sharing.  This recipe deserves to be popular.


cinnamon swirl.
1/3 cup granulated sugar
1 TBSP Cinnamon

1.) Preheat over to 350 degrees F.
2.) Combine cinnamon and sugar together; set aside.
3.) Generously flour and butter a 9x5 bread pan; set aside.
bread.

3-4 over-ripe bananas (mine were huge, so I only used 2)


Now that's a big banana. (Heh, I couldn't resist)


1 cup sugar
1 egg (beaten)
1/3 cup melted butter
1 tsp vanilla
1 tsp baking soda
dash of salt
1 1/2 cups flour

4.) In an electric mixer, beat the first 5 ingredients together.  
5.) Sprinkle the baking soda and salt over the top of the batter; mix.
6.) Slowly add the flour; beat until it is just incorporated, don’t over mix here.
7.) Pour half of the batter into the prepared pan
8.) Sprinkle half the cinnamon/sugar mixture over the batter.
9.) Pour the other half of the batter over the cinnamon/sugar mixture.
10.) Sprinkle the remaining cinnamon/sugar mixture over the the top of the batter.
11.) Bake for 50-60 minutes, or until you can insert  a toothpick into the center and comes out clean.


Monday, July 12, 2010

Lancaster County Wet Bottom Shoo Fly Pie


I'm celebrating my roots today.  Well...okay, not really.  My boyfriend has been asking for a shoo fly pie so I finally buckled down and made one.  Shoo Fly Pie? What the heck is that? Well, basically, it is molasses pie.  It's got a gooey bottom (i.e., wet bottom...um, how crude, by the way) and a crumby top (hahaha).  It is a very traditional Pennsylvania Dutch dessert.  Apparently, when the first of the Mennonites and Amish settled in Pennsylvania, they could only bring items with them that were non-perishable and that could survive the long boat trip (makes sense).  These staples were items like brown sugar, molasses, flour, lard, salt and spices.  Hence, the women had to make due with what they had so they concocted this deliciousness called a Shoo Fly Pie.  The origin of the name is not 100% known but the rumor is that they had outdoor ovens and because the molasses in the pie was so sticky and sweet, it attracted flies.  Now how is that for a history lesson?  Don't say I never taught you anything.


I found this recipe in my Grandmother's recipe index so authentic is definitely what you are getting here.

crumb topping.
1 cup flour
1/2 cup light brown sugar
1/4 cup shortening
1/2 tsp. salt


filling.
1 cup boiling water
1 cup light molasses (I used dark because...I have no idea what light molasses is)
1 tsp. baking soda
1 egg, beaten


  1. Preheat oven to 350 degrees F.
  2. Mix crumb topping ingredients together, using a pastry blender, until very fine. Set aside. 
  3. Blend together water, molasses and baking soda.
  4. Mix in egg.
  5. Pour into a 9-inch unbaked pie shell* (they say to use a deep dish pie crust here, but I didn't. Maybe that is why my crumb topping was so crumby).
  6. Using a large spoon, mix the crumb mixture well into the molasses filling
  7. Bake 35-40 minutes.
*Okay, so here's the deal.  It is really easy to make pie crust and it tastes sooo much better than pre-made.  But guess what, I was feeling lazy when I baked this and I didn't feel like getting depressed because I can never crimp my edges nicely.  So I did it.  I used a pre-made.  Yea, I knew it was wrong but I did it anyway.  And I liked it. Um...and it looked a lot prettier than mine ever does.  Didn't taste as good though. 


Sunday, July 4, 2010

Easy Fruit and Cheese Danish Recipe


So the fat kid in me was really craving a cheese danish the past couple of days.  I'm not really sure why, I rarely eat pastries but I couldn't stop thinking about cheese danishes for at least 3 days...ha.  I don't really know of any good bakeries near me and I had some Pillsbury Croissant dough in my fridge, so I decided to make them.  This is a pretty dangerous because you only need 3 ingredients and 11 minutes and they are really good.  The best part about it is that you can make them any flavor you want really, because I just put jam in the center for the flavoring.  I used rasberry jam.  My grandmother made it for me and I don't otherwise eat jam but it turned out to be the perfect ingredient for these danishes.

rasberry cream cheese danishes.
pillsbury canned instant croissant dough
1 tsp jam (your choice of flavor)
1 tsp cream cheese (I used 1/3 less fat but not like it matters, there isn't really any way these are low fat)


  1. Break open can of croissant dough and unroll.
  2. Tear along dotted lines into 4 squares (2 croissant triangles per square)
  3. Place 1 tsp of jam and 1 tsp of cream cheese in the center of each square.
  4. Fold four corners of each square into center and pinch to close.
  5. Bake in oven according to directions on can.
Thats it. You're done and it and looks like you spent tons of time on these put you're really just a cheater.  But nobody needs to know that. 


Saturday, July 3, 2010

Baby Shower Cake Pops


So my oldest sister is pregnant with her first daughter and obviously my soon to be niece. I am so incredibly stoked for her and to meet the new baby Hadlow. Her best friend and sister-in-law set up a beautiful baby shower in New York City so I decided to contribute and try my hand at cake pops again.  They turned out MUCH better than the first time.  This time instead of using an entire can of frosting, I only used about 3/4 of a can.  I put the melted chocolate in a pastry bag with a thin tip to decorate and they turned out pretty awesome...if I do say so myself.


The baby shower gang.  My sister is so cute...you can barely tell she is preggers:


On that note, I know I've been MIA for a while but I've been going through some major changes lately.  I quit my very stable, well paying job in Washington, D.C. to go back to school for Nursing.  I moved up to Altoona, Pa which is quite the change, let me tell you.  I don't know anybody in this town and I am surrounded by mountains like I'm trapped in a valley of slightly odd people.  The program is 16 months and I will have my Bachelors in Nursing and then it is off to school again for my masters so I can ultimately become a Nurse Practitioner.  I'm looking forward to my new niece and there are a lot of exciting changes to come so forgive me if my entries take a vacation for a while, I'll do my best.  
 

Blog Template by YummyLolly.com