Showing posts with label cake. Show all posts
Saturday, April 9, 2011

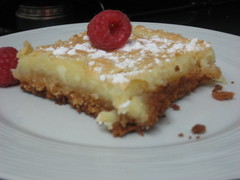
Nutella Gooey Butter Cake


So do you remember that post I wrote long ago called 'Dear South, What the Heck is Gooey Butter Cake'? I was so baking naive way back in April 2010 wasn't I? Well anyway, I found an upgrade. And while I'm a little upset to part with the original recipe because it was SO good, I had to venture and try this one I found using Nutella. If it involves Nutella, it's gotta be good. The original recipe came from Let's Dish. I kept everything the same except I didn't use Devil's Food Cake for the crust. I just used plain yellow cake mix. I thought the chocolate crust and the Nutella center might be a little too rich for me. Overall, it turned out really good but I think I actually like the original better. I don't know, what do you think?


nutella gooey butter cake.


crust.
1 package yellow cake mix
1 egg
8 tablespoons butter, melted

filling:
1 (8 oz.) package cream cheese, softened
1 cup Nutella (save yourself some time, this is about the contents of 1 13 oz jar)
3 eggs
1 teaspoon vanilla
8 tablespoons butter, melted
1 (16 oz.) box powdered sugar

  1. Preheat oven to 350 degrees F. Butter a 9x13 inch baking pan.
  2. Mix cake mix, butter and egg together until a light dough forms.
  3. Spread dough across bottom of prepared pan.
  4. Beat cream cheese until smooth.
  5. Add the eggs, vanilla and butter and beat together.
  6. Add powdered sugar and beat well.
  7. Spread over cake batter and bake for 40-50 minutes (mine took about 38 minutes). Center should not be quite set. Don't cook too long or its not gooey!


Saturday, July 3, 2010

Baby Shower Cake Pops


So my oldest sister is pregnant with her first daughter and obviously my soon to be niece. I am so incredibly stoked for her and to meet the new baby Hadlow. Her best friend and sister-in-law set up a beautiful baby shower in New York City so I decided to contribute and try my hand at cake pops again.  They turned out MUCH better than the first time.  This time instead of using an entire can of frosting, I only used about 3/4 of a can.  I put the melted chocolate in a pastry bag with a thin tip to decorate and they turned out pretty awesome...if I do say so myself.


The baby shower gang.  My sister is so cute...you can barely tell she is preggers:


On that note, I know I've been MIA for a while but I've been going through some major changes lately.  I quit my very stable, well paying job in Washington, D.C. to go back to school for Nursing.  I moved up to Altoona, Pa which is quite the change, let me tell you.  I don't know anybody in this town and I am surrounded by mountains like I'm trapped in a valley of slightly odd people.  The program is 16 months and I will have my Bachelors in Nursing and then it is off to school again for my masters so I can ultimately become a Nurse Practitioner.  I'm looking forward to my new niece and there are a lot of exciting changes to come so forgive me if my entries take a vacation for a while, I'll do my best.  
Friday, May 21, 2010

Lemon Lemon Loaf or in my terms 'Lemon Glazed Pound Cake'


Yea, so this is another 'Baked' recipe.  I'm sorry.  I feel like most of my recipes have come from this book lately but I just can't help it.  The recipes are SO good.  Maybe I'll be like that girl in Julie and Julia and bake everything in their book, I mean, I'm well on my way.  The only difference is I don't have the dedication or the concentration to post everyday AND bake every day. I mean, that's a lot of work. 

Anyway, I'd give the recipe...ehhhh, a 7.  It was good but a little dry.  I'm not really sure after 8 eggs and 1 POUND of butter how it was dry, but it was.  They say that lemon glaze on the top is optional...not in my book.  That stuff was awesome.  I ended up eating the top of the cake everytime and leaving the rest of my slice on the plate. HAHA.


lemon cake.
1 1/2 cups cake flour.
1 1/2 cups all-purpose flour.
2 tsp baking powder
1/4 tsp baking soda
1 tsp salt
2 1/4 cups sugar
8 large eggs
1/4 cup grated lemon zest (about 4 lemons)
1/4 cup fresh lemon juice
2 cups (4 sticks) unsalted butter, melted and cooled
1/2 cup sour cream (room temp)
2 tsp pure vanilla extract

lemon syrup.
1/3 cup fresh lemon juice
1/3 cup sugar

lemon glaze. (they say optional, I say not)
2 cups confectioners' sugar, sifted
4 to 6 tbsp fresh lemon juice

for the cake.

  1. Preheat oven to 350 degrees F. Spray the sides and bottom of two 9 by 5 by 3 inch loaf pans with nonstick cooking spray.  Line the bottom with parchment paper.
  2. Combine flours, baking powder, baking soda and salt in a bowl and set aside.
  3. In a food processor (YAY, I could complete this step because I actually have one now), blend sugar, eggs, lemon rind and lemon juice. 
  4. Slowly add melted butter and vanilla through the spout at the top and pulse until combined.
  5. Fold flour mixture into lemon/sugar mixture until just combined.  Do not over mix.
  6. Pour mixture into prepared loaf pans and cook for 20 minutes, rotating pans half way through cycle.
  7. Turn temperature down to 325 degrees F. and continue to bake for 35 minutes. Remove from oven when a toothpick inserted into the center comes out clean.
  8. While loaf is baking, prepare lemon syrup:
    1. Heat lemon juice and sugar in saucepan over medium-high heat until sugar is dissolved.  Continue cooking for 3 more minutes.
    2. Remove mixture from heat and set aside.
  9. Invert both loaves onto a cooling rack and poke with a toothpick over the top and sides of the loaves.
  10. Brush glaze over the loaves and let soak for about 5 minutes.
  11. If you are preparing the lemon glaze (which I strongly strongly recommend), combine the confectioners sugar and lemon juice.  Mix and add more lemon juice or confectioners sugar (to thin or thicken the mixture) until you have reached the desired consistency.
  12. Drizzle mixture over the top of the loaves and let set for about 15 minutes.


Sunday, May 16, 2010

Pink Not-So-Cakey Cake Pops


There is this phenomenon all over the internet that I've been running into called Cake Pops.  Despite bloggers' warnings of being time consuming and messy, I had to try them for absolutely no reason at all.  I read the instructions on multiple sights and thought "Cake Pops? Piece of cake...piece of crumb. Cake."  Needless to say, I should have taken my fellow bloggers' advice because for a project I thought would take me a couple hours tops, ended up taking me two days.  Now granted, I took some 'lessons learned' away and I don't think it will take me nearly as long as it did this time if I make these again.  Before I start my rant, I am going to refer you to Bakerella.  She is the mastermind behind this phenomenon and her cake pops are perfect and absolutely adorable.  You can find the recipe on her website and a lot of inspiration for different ideas of decorating.


Of course I had visions of beautiful pink and green and brown cake pops, perfectly spherical with intricate little decorative details (perfect little polka dots, eye catching 'splatters', and willy wonka swirls) and then adorable little polka dot ribbon bows for the finishing touch. My effort would be flawless; neatly coating little cake balls with brightly colored chocolate. Why is it that my visions are always so far from reality?
                      
                The reality of my perfect cake pop looked like this:


If you would like to hear the reality of the situation, it went something like this: I used one whole can of icing as all of the instructions I read said,  but the 'dough' seemed awfully mushy.  I had a sinking feeling that it wasn't right but then decided that all the time it would spend in the refrigerator would surely firm them up.  I guess the instructions didn't say to eat chunks of cake as you were mashing it into crumbs...hmmm.

Eating this...
will brutally shatter your vision of perfect cake pops.

They also didn't say that the batter needed to go into the refrigerator BEFORE making the balls as I did with mine.  Anyway, after letting the dough chill for about an hour, I tried making the cake balls but they kept sticking to my hands after I'd make a few, so back into the refrigerator the dough went until it was chilled enough that I could make about 5 more cake balls.  Repeat this step for a few hours...that is what my Saturday afternoon consisted of.  Finally, after the balls were made, I chilled them for a few more hours as the recipes said.

Gooey cake batter, does not a perfect cake ball make.


I then coated the ends of my lollipop sticks in chocolate before inserting them into the cake balls...simple right? Nope.  The chocolate dripped down my fingers and the lollipop stick and when I inserted them into the cake balls, the cake ball batter was still too mushy and it squished the balls so they had flat heads.  Then I chilled them again for a few more hours thinking they would surely be firm enough but once again, I was wrong. First off, when I tried to coat the cake balls, some of them actually fell off into the chocolate leaving chunks of cake batter in my chocolate. Secondly, for whatever the reason, the green chocolate clumped up in the microwave and burned to the sides (even though I put it in for 30 seconds at a time as the instructions read...the pink and brown didn't do this).  And then when I tried to decorate them, I didn't have one of those squirt bottles so I used a zip lock bag, but I cut the hole too big so my decorations were a disaster.  Not to mention, I had drops of now hardened chocolate all over the counter, my hands and my styrofoam stand.  Eventually I gave up for the day and only finished about 15 of them.  The next day I went to put the little bags on them and ribbon them up, but my roll of ribbon only covered about 7 of them.


So needless to say, my first cake ball experience was quite the disaster...but knowing what I know now, I think I might be able to make them work the next time.

Sunday, May 2, 2010

Mint Chocolate Angel Food Cake


I finally got a chance to appease my angel food cake craving this weekend.  I probably could have made it prettier but I was feeling slightly lazy, however; I did put my own twist on it and made mint chocolate angel food cake.  The best part about this recipe is that it tastes amazing and there is no butter in it! Imagine that.  Egg whites and sugar...that means there are no calories correct? Correct.  Anyway, here it is, my own recipe:

mint chocolate angel food cake.
2/3 cup cake flour
1/3 cup unsweetened cocoa
1 1/2 cups super fine sugar
12 egg whites (room temp)
1/3 cup warm water
1 1/2 teaspoons cream of tartar
1 tsp peppermint extract

  1. Preheat oven to 350 degrees F.
  2. In a medium mixing bowl, combine the cake flour, cocoa, the salt and 1/2 of the sugar.
  3. In the bowl of an electric mixer, combine egg whites, extract, water and cream of tartar on medium speed.  
  4. Add the sugar to the mixture that had not yet been combined with the flour mixture and continue to beat until medium peaks form. 


5.  Sprinkle flour mixture over the top of the egg white mixture and fold in with a spatula.  Continue to  do this with the rest of the flour mixture until it is completely incorporated.
6. Pour batter into a 10" tube pan and bake for 30-35 minutes.
7. Let cool upside down on a cooling rack for at least one hour before removing from pan.

Tuesday, April 27, 2010

Dear South: What in the heck is gooey butter cake?

Gooey Butter Cake.  A food that most Yankees such as myself would raise their eyebrows and/or roll their eyeballs at you if you mentioned...what the heck is that? As I become more and more obsessed with food blogs I keep seeing this strange recipe.  I am not a Southern girl.  I was born and raised in Pennsylvania and haven't lived below northern Virginia.  I don't know too much about the South either but I do know this: every 'southern' food that I have ever tried has been indescribably amazing.  Its like...comfort food, even though I've never had it before.  Anyway, after seeing this recipe repeatedly on multiple blogs and then I saw it in a Paula Deen magazine and that was the last straw.  I had to try.  I really wanted to try this from 100% scratch but I forgot to take my butter out of the freezer so I had to cheat a little bit and use the recipe with the cake mix.  I will make this again from 100% scratch, I promise but this will have to do for now.  It is Paula Deen's recipe so I mean, I'm pretty sure it can't be bad.

gooey butter cake.
1 box of yellow cake mix (I used Duncan Hines white cake mix, I didn't have yellow)
1 egg (room temp of course)
8 tablespoons butter.


filling.
1 8 ounce package of cream cheese (softened)
2 eggs
1 tablespoon vanilla
8 tablespoons butter, melted
1 16 oz box of powdered sugar

  1.  Preheat oven to 350 degrees F.  Butter a 9x13 inch baking pan.
  2. Mix cake mix, butter and egg together until a light dough forms.
  3. Spread dough across bottom of prepared pan.
  4. Beat cream cheese until smooth.
  5. Add the eggs, vanilla and butter and beat together.
  6. Add powdered sugar and beat well.
  7. Spread over cake batter and bake for 40-50 minutes (mine took about 38 minutes).  Center should not be quite set.  Don't cook too long or its not gooey!


    Oh. Man.  This stuff is really. freaking. good.  I just tried my first piece.  I don't even know how to describe it.  Its like chewy on the bottom and gooey on the top.  Its like sugary, buttery, carmely, candy cake or something.  I think this is my new favorite dessert.  And the best part? It literally took me 10 minutes to throw this together.  I can't wait to try it completely from scratch, but for now...bring on the cake mix.   Just try it and you'll stop judging.


    Want to try more cake? Try the only carrot cake you will ever make again.  You won't be disappointed, I promise.
    Monday, April 19, 2010

    the only carrot cake you will ever make again.

    First off, I apologize that I only have this really horrible picture to post up here.  I made this and only had time to take a picture on my iPhone (it was already 6 months late) and I didn’t even think about it until I was packaging an extra slice up for a coworker.  I promised my team lead at work that I would make her a carrot cake for her birthday.  That was in October.  I delivered the cake at the end of March.  I got this recipe from Ann Hodgman’s “Beat This” Cookbook.  It is my absolute favorite.  I have never made something from that book that was not amazing, carrot cake included. For whatever reason, the book is no longer in print but you can still buy it on Amazon.com.  Honestly, I don’t even like carrot cake.  Who wants carrots and cake? It defeats the purpose if you ask me.  But this cake was so incredibly delicious, I think I ate at least 1/4 of it, in addition to the the enormous amounts of batter, filling and frosting I shoved into my my face while making it.  Please try this, I guarantee, you will not be disappointed.


    pecan cream filling.
    *make this one day ahead of time

    1 1/2 cups sugar
    1/4 cup all-purpose flour
    3/4 tsp salt
    1 1/2 cup heavy cream
    3/4 cup (1 1/2 sticks) unsalted butter
    1 1/4 cup chopped pecans, lightly toasted
    2 tsp vanilla extract

    1. A day before the cake is made, blend sugar, flour, and salt in a heavy saucepan over low heat.
    2. Gradually stir in the cream.
    3. Add the butter
    4. Cook and stir the mixture over low heat until the butter has melted.
    5. Let simmer 20-30 minutes until golden brown, stirring occasionally*
    6. Remove from heat and cool to lukewarm.
    7. Stir in the pecans and vanilla.
    8. Refrigerate overnight
    9. Bring to room temperature before using.

    *The recipe says occasionally but it was moreso, stir constantly and you can take a break occasionally.  It clumped together on the bottom and sides if I let it sit without stirring.

    carrot cake.
    1 1/4 cups corn oil
    2 cups sugar (preferably superfine)*
    2 cups all-purpose flour
    2 tsp cinnamon
    2 tsp baking powder
    1 tsp baking soda
    1 tsp salt
    4 large eggs
    4 cups grated carrots (about 1 pound)**
    1 cup chopped pecans

    1. Preheat oven to 350 degrees F. 
    2. Generously butter and flour a 10-inch tube pan
    3. In a large bowl, whisk together the corn oil and the sugar
    4. In another bowl , sift together the flour, cinnamon, baking powder, baking soda and salt. 
    5. Sift half the dry ingredients into the oil-sugar, mixture and blend well.
    6. Sift the rest of the dry ingredients into the mixture.
    7. Add eggs one at a time, blending each before adding the next.
    8. Add carrots and pecans, mix until incorporated. 
    9. Pour the batter into the prepared tube pan; bake for 70 minutes, or until the cake begins to pull away from the sides of the pan.
    10. Cool upright, in the pan on a cooling rack.

    **I would highly highly highly recommend a food processor for grating the carrots.  I didn’t have one.  Needless to say, my night was spent grating carrots with a hand grater watching American Idol.

    icing.
    1 cup (2 sticks) unsalted butter, room temp
    8 oz cream cheese, room temp
    1 1-pound box (or bag) of confectioners’ sugar
    1 tsp vanilla extract
    pinch salt

    1. Cream together the butter and cream cheese until well blended and fluffy.
    2. Sift in the confectioners’ sugar; cream again.
    3. Beat in the vanilla and salt.
    4. If the icing is too soft to spread, chill it for a few minutes.  Refrigerate it if you don’t plan to use it right away, but bring it back to room temperature before using.

    assembling the cake.

    1. Run a spatula around the inside of the tube pan to loosen the cake.
    2. Invert the cake onto a serving plate.  With a long serrated knife, carefully split the cake into 3 horizontal layers*.
    3. Spread the pecan filling between the layers**.
    4. Frost the top and sides of the cake.

    *I was scared when I saw this step, but that is because I’m a novice.  It was actually not that bad.  I would just recommend waiting until the cake is completely cool...maybe a few hours.  I put small cuts around the first layer and then just connected them with my knife, pulled that layer off, set aside and then did the same with the next layer.  The layers are actually heavy and I didn’t let it cool completely so it was really hot inside when I pulled the layers away.
    ** Again, another reason to let the cake cool completely.  When I put the cake together, the filling sort of melted and then squished out the sides when I added the second layer and it did it even worse when I put the top on.  It all came together in the end but it would have been much better had I been patient and let the cake cool.  Patience is a virtue, patience is a virtue. 


    Blog Template by YummyLolly.com